The PO matching functionality of the EzzyBills integration allows you to leverage EzzyBills powerful line-item-level data extraction to automate the application of supplier invoices sent to EzzyBills against WorkGuru purchases.
Before setting up the workflow integration, you will need to connect to EzzyBills first and test the connection. After successfully testing the connection, save your webhook token (see below for a guide on where to find it) and toggle the Match EzzyBills Supplier Invoices to WorkGuru Purchase Orders checkbox, then hit save.
How it works
When a purchase order is created and approved within WorkGuru, we'll send that purchase to Ezzybills. When the supplier invoice is received and uploaded against the PO matching workflow within EzzyBills, those details will then flow back through to WorkGuru via a webhook and automatically be applied against the purchase order, updating the purchase order as relevant and marking it received. The supplier invoice
Steps:
- Set-up workflow integration (See the instructions linked above)
- Enable the Match EzzyBills Supplier Invoices checkbox on the EzzyBills integration page within WorkGuru
- Create and approve PO in Workguru
- Upload invoice to the relevant workflow in EzzyBills (With same PO id in step 2)
Setup EzzyBills Workflow Integration
To use the PO matching functionality, first you must create an EzzyBills workflow. The recommended workflow setup is defined below:
- Start
- Pre-extract
- Extract
- WorkGuru Export
- Check PO Exists (*)
- MatchPO (*)
- Webhook (With URL and Token setup)
- Finish
*Step 5 and 6 is required when syncing file back and attaching file to correct PO. Be awared this flow currently only support PO within the project, and the PO will be synced to Ezzybills side after approve.
Stepping it out, start by selecting Workflows in EzzyBills located under the Dashboard as pictured below;

On the workflows dashboard, click the New Workflow dropdown at the top right, and select Create Workflow Using Template, then select Create Custom Workflow.
The recommended workflow setup is defined in the below screenshot. Find the tasks on the left side of the page, and click and drag them into the workflow canvas in the same order as below.
Under the Webhook task, click on the settings cog and save the webhook url and your webhook token as below. You can find your webhook token in your account settings - see below for a step-by-step guide.

Webhook settings:
1. URL value is different between countries :
AU/NZ: https://app.workguru.io/EzzyBillsWebHook/QueueGetMatchedPoDetailsFromEzzyBills
UK: https://uk.workguru.io/EzzyBillsWebHook/QueueGetMatchedPoDetailsFromEzzyBills
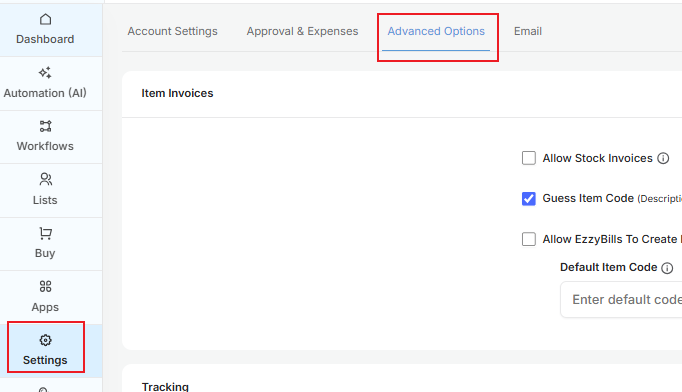
2. Token Can be found at the bottom of Settings -> Advanced Options 

Verify
Once the workflow has been saved, you can now use the PO matching integration functionality. You can test this functionality by following these steps:
- Create and approve a purchase order within WorkGuru
- Generate a dummy supplier invoice by printing the purchase order using a document template of your design
- Upload the dummy supplier invoice against the PO matching workflow in EzzyBills
- Review the status of the data extraction for that invoice in EzzyBills
- Once the status is "Complete", take a look at the purchase order within WorkGuru and verify the invoice information against the invoice uploaded to EzzyBills
- The supplier invoice uploaded to EzzyBills will be uploaded as a file against the purchase order in WorkGuru

Please note: if using the receipt upload functionality of the EzzyBills integration, the PO matching workflow in EzzyBills must not be set as the default, otherwise receipt uploads will fail at the Check PO Exists and/or MatchPO steps of the EzzyBills workflow
Trouble Shooting
CheckPO failed. Purchase order: does not exist.:
This error is caused by either PO hasn't been sent throug or OCR on Ezzybills side failed to parse detail from uploaded file.

- Step 1: Find the PO matching setting area in Settings -> Advanced Optioons page(img 1), and add "+PO, Purchase Order" in the Purchase Order Keywords(img 2). If your template has different keyword, put the keyword from your template instead.
Img 1
Img 2

- Step 2: If step 1 is set up correctly, you can click the DocID to access file details page (img 3), then search "PurchaseOrder" at Form-Data tab (img 4, 5), you should able to find the PO number.
- If PO number exists, means WorkGuru hasn'y synced PO, just wait for few minutes then try again.
- If PO number doesn't exist, means step1 having some problems to recognize the PO number from file, suggest to review the flow, update your file template to make sure words are clear or reach out to EzzyBills support.
Img 3

Img4 
Img 5
Was this article helpful?
That’s Great!
Thank you for your feedback
Sorry! We couldn't be helpful
Thank you for your feedback
Feedback sent
We appreciate your effort and will try to fix the article